August 5, 2026
Viewing the Sun: 2026 Total Eclipse Guide
Direct viewing the Sun is only safe during the brief totality of a total solar eclipse. During every partial phase, you need ISO 12312-2 certified protection without exception.
If you're planning for the 12 August 2026 eclipse in Europe, you're probably juggling three questions at once. Where should you go, what gear matters, and how do you avoid the kind of mistake that turns a once-in-a-lifetime sky event into a medical emergency? The answer starts with the same rule every experienced eclipse chaser learns the hard way, safety isn't a side topic, it decides everything from your site choice to your camera settings.
Table of Contents
- Why the First Rule of Viewing the Sun Changes Everything
- Choosing the Right Site for Your Eclipse Experience
- Equipment and Gear for Safe Solar Observation
- Photography Settings for the Partial Phases and Totality
- Timing Your Eclipse Experience City by City
- Weather Contingency and Travel Planning Strategies
- Eclipse Day Step by Step From First Contact to Last
Why the First Rule of Viewing the Sun Changes Everything
The first time totality arrives, the scene does not just get darker. The air can feel off, the light turns metallic, and the Sun hangs in the sky like a black disk edged with fire. That is the moment people carry home for years, and it is also the moment that makes eclipse safety part of every other decision you make.
The rule is straightforward. Direct viewing is safe only during the brief totality of a total solar eclipse. At every other point, including the smallest sliver before and after totality, certified solar protection is required because the remaining photosphere can injure eyes quickly. Berkeley's Sunspots history page warns that sunlight includes powerful ultraviolet radiation and says you should never look directly at the Sun Berkeley Sunspots history.
What totality changes and what it doesn't
Totality is the one window when naked-eye viewing belongs in the experience. The Moon fully covers the bright face of the Sun, and the corona, prominences, and surrounding sky become visible in a way no filter can safely reproduce. Outside that short interval, the Sun stays hazardous, even when the eclipse looks deep enough to tempt you.
Practical rule: If you are not inside the path of totality, keep your solar glasses on the entire time.
That rule matters because partial phases are deceptive. A thin crescent still concentrates enough light to burn the retina, and the injury can happen without pain. The National Solar Observatory warns that direct viewing is unsafe during partial phases, even when the Sun appears almost fully covered NSO eclipse safety.
| Condition | Naked Eye | Camera/Telescope | Required Protection |
|---|---|---|---|
| Partial phase | Unsafe | Unsafe without front-mounted solar filter | ISO 12312-2 glasses or certified solar filter |
| Brief totality | Safe | Safe for direct viewing, with careful timing | No solar filter on the eye or lens during totality |
| First bright edge returns | Unsafe again | Unsafe again without filter | Put protection back on immediately |
The eyewear standard matters because ordinary dark lenses are not enough. For direct solar viewing, safe filters must meet ISO 12312-2, and NASA's eclipse guidance says they need to transmit less than 0.003% of visible light and no more than 0.5% of near-infrared radiation AAS eclipse eye safety. That is why homemade filters, scratched lenses, and sunglasses do not belong anywhere near eclipse viewing.
For the 2026 event, that safety rule should shape site choice as much as timing. The path of totality in Spain comes with a very low Sun, so the western horizon has to stay clean right through the end of the eclipse. Check the path of totality map before you commit to a location, because a perfect forecast does not help if a ridge, tree line, or building cuts off the last view.
When you plan with that in mind, safety stops being a separate checklist item. It becomes part of how you choose a horizon, where you set up a camera, and how quickly you can put protection back on when the first bright edge returns.
Choosing the Right Site for Your Eclipse Experience
Iceland and Spain aren't just two places on a map. They're two different eclipse experiences, and the wrong choice can turn a long-planned trip into a frustrating near miss. Iceland offers a higher Sun angle and an earlier local timing, while Spain offers a more dramatic sunset geometry and, in optimal locations, a longer totality experience.
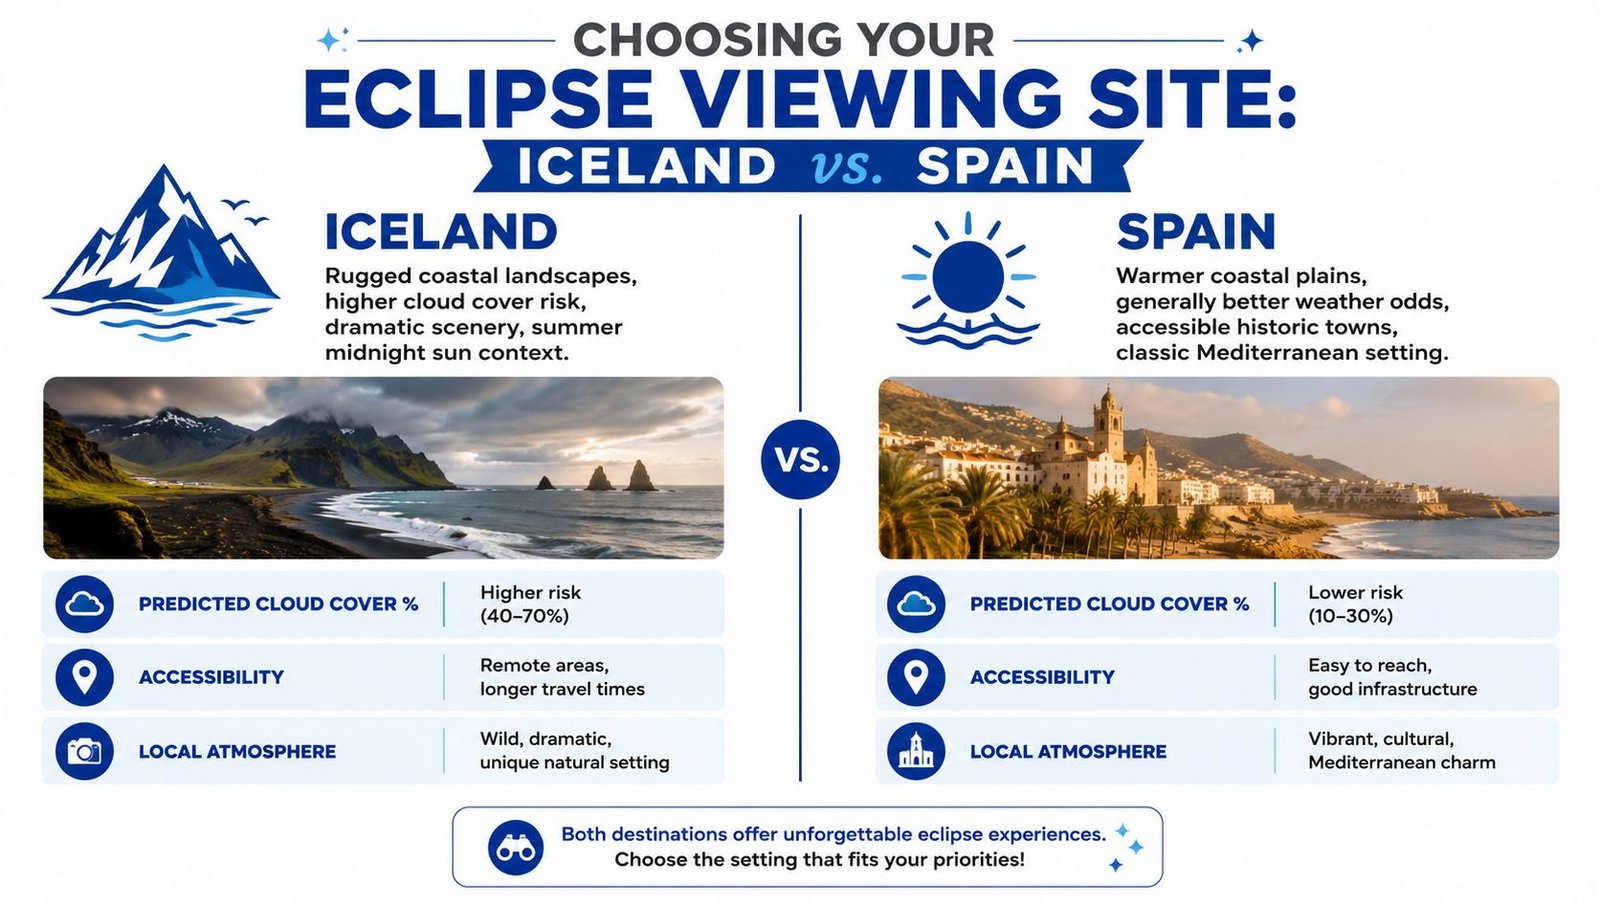
Iceland suits simpler geometry, Spain demands horizon discipline
In Iceland, the Sun sits higher, which makes the viewing geometry more forgiving. You're still dealing with the usual summer travel realities, but you don't have the same sunset compression that Spain brings. In Spain, the eclipse happens near sunset, and the business brief notes the Spanish track of totality occurs with the Sun at roughly 10 to 12 degrees of solar altitude during totality, so the western horizon has to be exceptionally clear.
That low angle changes everything. A hill, a line of trees, haze off the coast, or a row of buildings can erase the view at the worst possible moment. Coastal lookouts and wide-open western horizons matter more than raw proximity to the centerline.
Site rule: In Spain, choose the clearest western horizon you can get, not just the closest pin on the map.
The contrast also shows up in planning style. In Iceland, weather risk and travel logistics take center stage. In Spain, you need to balance weather against horizon height and sunset timing. One country asks for mobility and patience, the other asks for geometry discipline and a view that stays open all the way to the horizon.
| Factor | Iceland | Northern Spain |
|---|---|---|
| Solar altitude | Higher | Very low near sunset |
| Horizon pressure | Moderate | Critical |
| Weather planning | Changeable summer conditions | Often better inland than on the coast |
| Viewing style | More forgiving site geometry | Requires careful western exposure |
Use the interactive path tool and city tables to check your exact position in the shadow. The difference between being inside the path and sitting in a deep partial is not cosmetic, and the path-of-totality overview at the totality map makes that distinction much easier to judge.
Equipment and Gear for Safe Solar Observation
Good eclipse gear is about function, not shopping. Start with certified eclipse glasses that meet ISO 12312-2. If the glasses are scratched, torn, bent out of shape, or look homemade, leave them out of the bag. That is the line between safe viewing and gambling with your eyesight UKHSA eclipse safety guidance.
What belongs in the kit and what doesn't
For partial phases, the safest direct-view option is certified glasses or a handheld solar viewer. For optics, use a front-mounted solar filter on binoculars, telescopes, or a camera lens. Never use an eyepiece-mounted filter. Concentrated sunlight can crack or burn through that setup, which is why official guidance rejects it for direct solar work.
If you want the lowest-cost, low-risk option for casual viewing, go indirect. Pinhole projection works, and so do simple projection methods using a colander, tree leaves, or a capped binocular setup that projects the Sun onto a screen. AAS eclipse eye safety recommends projection as a safe approach when you do not need fine detail.
The safest method is not always the one with the best image. Projection is excellent for groups and kids, but it will not show the kind of fine structure that a filtered telescope can reveal.
For photographers, the camera body is not the safety device, the filter is. A DSLR, mirrorless body, or long lens still needs a front-mounted solar filter during partial phases. The camera can be part of the observing system, but it does not make the Sun safer.
Useful checklist:
- Certified eclipse glasses: For naked-eye viewing during partial phases.
- Front-mounted solar filter: For telescope, binocular, and camera work before totality.
- Projection screen: For indirect group viewing.
- Finder cap or lens cap: Prevents accidental eye exposure through optics.
- Backup pair of glasses: In case one lens frame gets damaged.
If you are buying glasses, the safety details matter more than the brand name. Check that they meet ISO 12312-2, and use the guidance at eclipse safety glasses to confirm what that compliance should look like.
Photography Settings for the Partial Phases and Totality
Eclipse photography works best when you stop treating the event as one long exposure problem. The Sun's brightness changes too much across the phases for a single setup to do all the work. Manual mode is the right starting point, with a fixed aperture and ISO and shutter speed as the main variable.
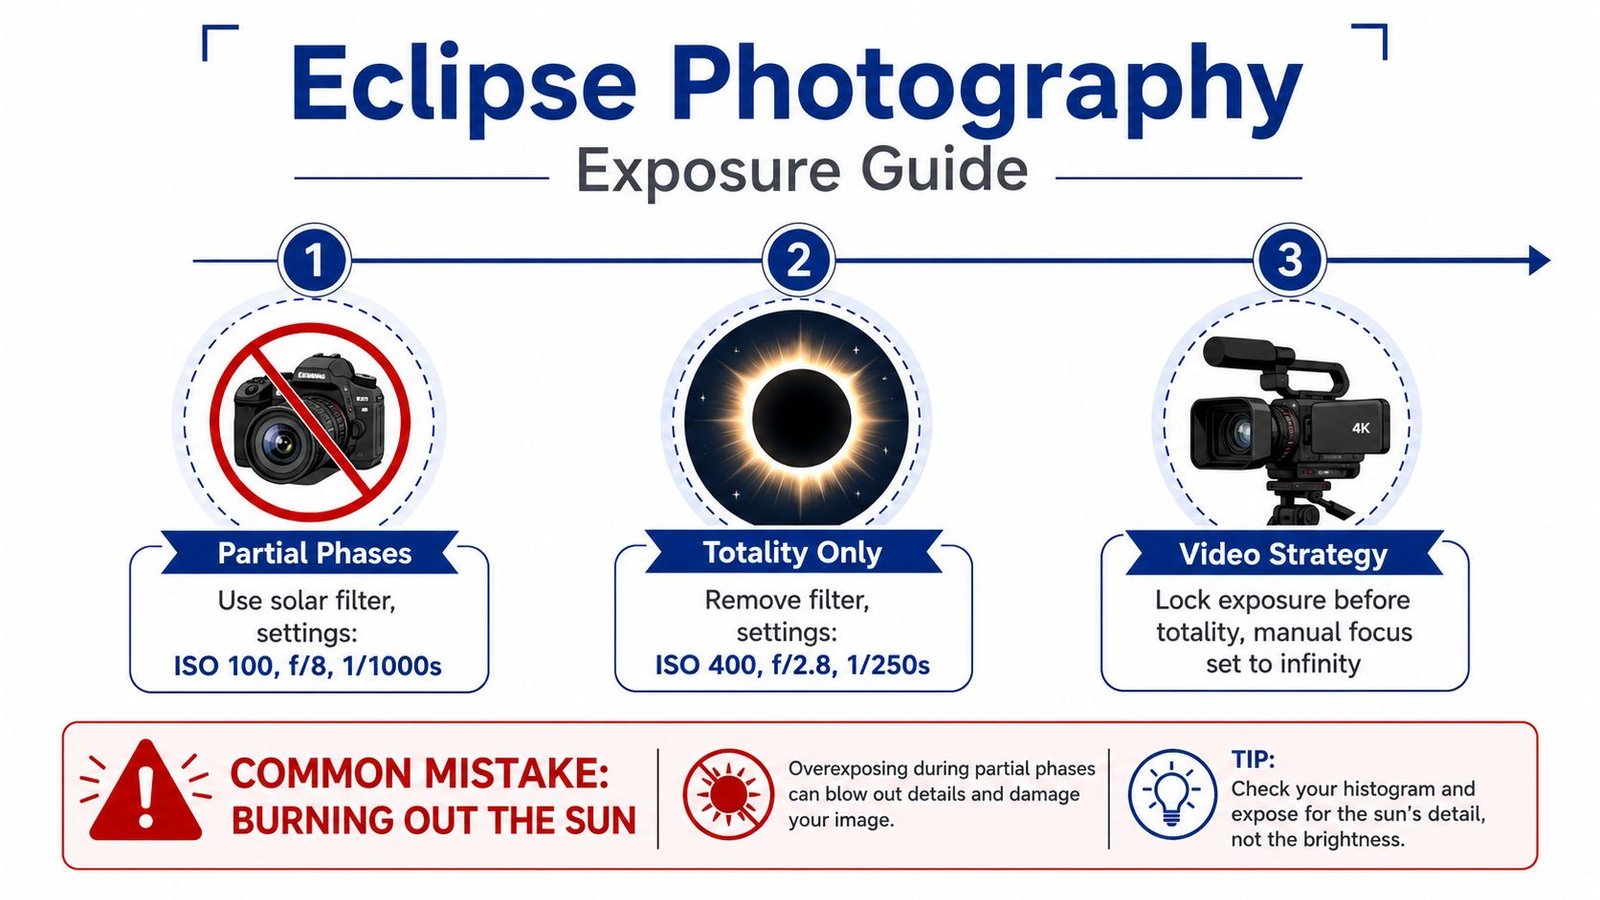
Shoot partial phases with the filter on
For the bright Sun in partial phases, keep the solar filter on. A practical starting point is ISO 100, f/8, 1/1000s, then adjust from there depending on your optics and sky clarity. Many photographers bracket around that with faster and slower shutter speeds so they can recover detail without chasing exposure mid-event.
The important part is timing the filter change correctly. Leave the filter on through every partial phase. Remove it only when totality begins, and put it back the instant the first bright edge of the Sun returns. The biggest avoidable mistake is leaving the filter off while the Sun is re-emerging.
Use a different exposure approach for totality
Totality is a separate exposure world. The corona is far dimmer than the un-eclipsed Sun, so the settings shift dramatically. A usable starting bracket for the total phase is around ISO 400, f/2.8, 1/250s, then longer exposures if you want the outer corona and shorter ones if you want the inner structure to stay crisp. A common working sequence is to step through faster and slower shutter speeds until you find the balance your lens can hold.
Field habit: Lock focus before totality, then stop touching the lens unless you have to. That one habit saves a lot of ruined frames.
For video, the best move is to lock exposure before totality and set manual focus to infinity. Autofocus often hunts at the worst possible time, and exposure jumps can make the transition into totality look ugly. The time-lapse workflow at solar eclipse time-lapse is especially useful if you want a sequence rather than a single hero frame.
| Eclipse Phase | Aperture | ISO | Shutter Speed Range | Solar Filter |
|---|---|---|---|---|
| Partial phases | f/8 | 100 | Around 1/1000s and faster | On |
| Approaching totality | f/8 to f/5.6 | 100 to 400 | Around 1/1000s to 1/60s | On until totality begins |
| Totality | f/2.8 to f/5.6 | 400 | Around 1/250s to 1s or longer | Off during totality only |
Smartphone photos are possible, but they're limited. Without a telephoto lens or an adapter, expect a small Sun and broad context rather than detailed solar structure. That's fine for memory shots, but it won't replace a filtered camera or binocular setup.
Timing Your Eclipse Experience City by City
City timing is where people lose eclipses they thought they had planned correctly. A difference of a few minutes, or even a slight location error, can move you from totality into a deep partial. That's why local timing matters more than national headlines.
Spain and Iceland need different clock habits
For Spanish cities on the totality track, the eclipse lands late in the day, around 20:30 CEST in the general planning window, and the usable viewing time is compressed by the low Sun angle. In Iceland, the event comes later by local clock, around 21:00 to 21:30 BST/WEST, which gives a different rhythm and a more forgiving solar altitude.
That timing difference affects how you move. In Spain, arriving early matters because sunset geometry leaves little margin for traffic, bad parking, or a site with a poor horizon. In Iceland, the bigger risk is being in the wrong weather pocket when the event starts.
Deep partial is not the same experience
London, Paris, Berlin, and Rome will all see meaningful coverage, but a deep partial still isn't totality. The numbers may look impressive on paper, yet the visual and emotional experience is different. The Moon can cover almost the entire Sun and still leave you without the corona, without the sudden darkness, and without the brief naked-eye window that makes totality so memorable.
Use the city simulator to check your own location, because exact coordinates matter. Two places in the same region can differ enough to change the quality of the event, especially near the edge of the path. The city-by-city table at the eclipse planner is designed for that exact kind of decision.
A 30-minute planning error can easily become a totality miss. The Moon doesn't care that you were “close enough.”
If you're deciding between staying put and driving for the path, prioritize the location that puts you inside totality rather than the one that only looks impressive on a percentage chart. Coverage numbers are useful, but they don't replace geometry, timing, or the local horizon.
Weather Contingency and Travel Planning Strategies
August weather gives you a chance, not a guarantee. Northern Spain often rewards inland positioning more than coastal guesswork, while Iceland can swing between clear and cloudy with very little warning. That uncertainty is why eclipse trips need a mobility plan, not just a hotel booking.
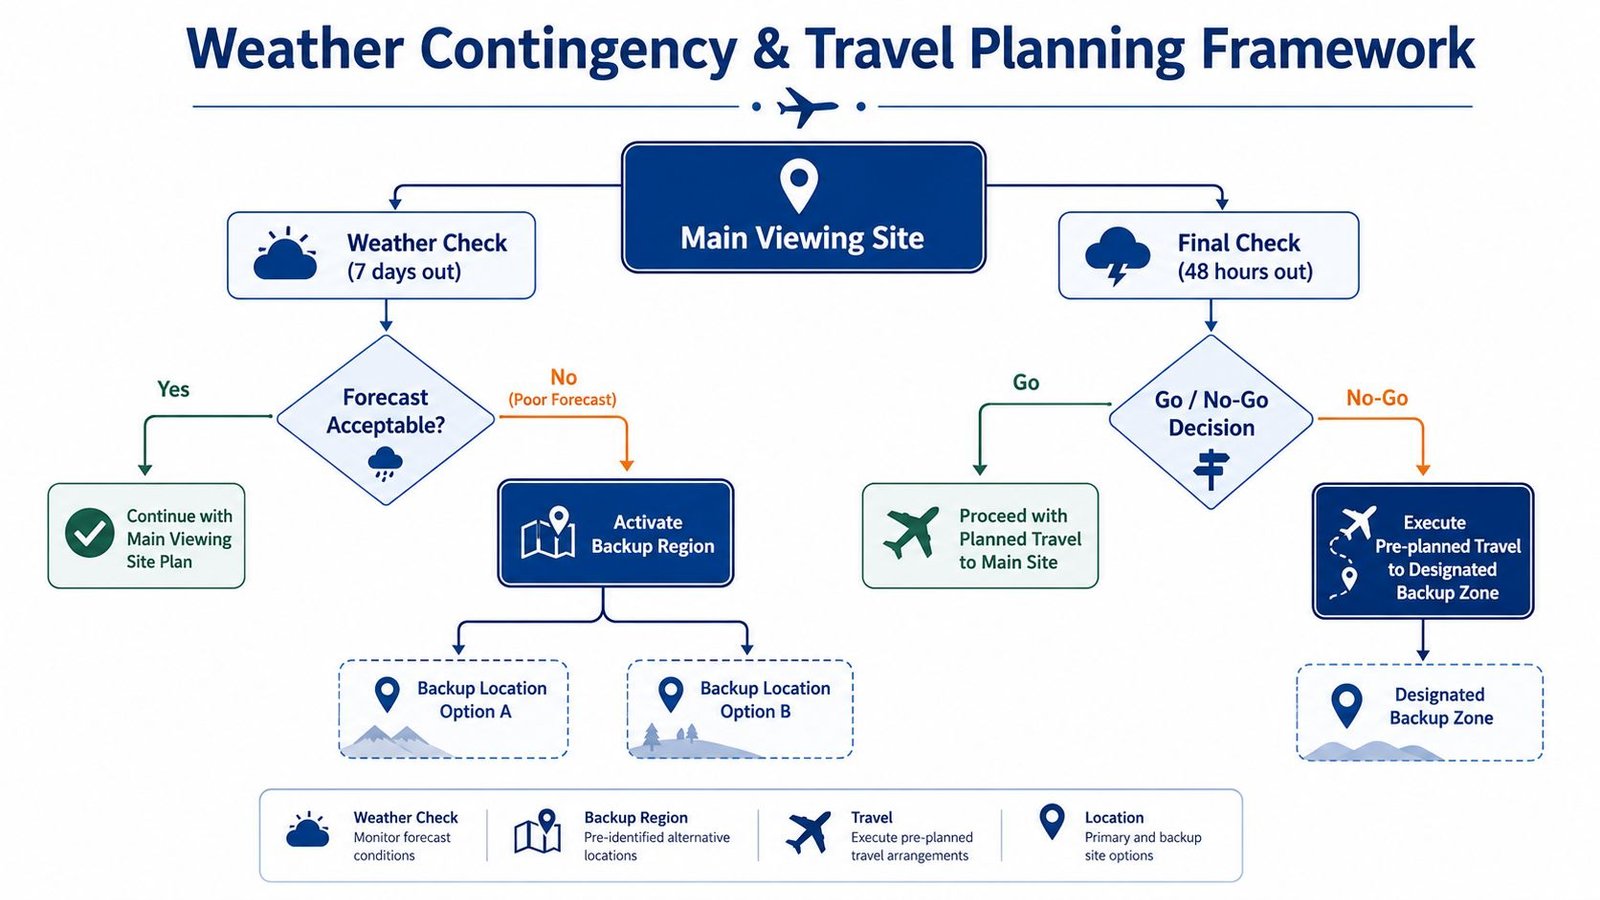
Build for movement, not hope
A good mobility strategy starts with a flexible base. Book accommodation with enough freedom to move if the forecast shifts, and keep your vehicle ready so you can reposition on eclipse day. That matters more in Iceland, where weather can change fast, but it also helps in Spain if coastal haze or low cloud starts to build.
For northern Spain, inland sites often deserve serious attention because they can offer better clear-sky odds than the coast in August. For Iceland, the trick is to treat the day as a weather puzzle, not a fixed destination. Your best-view site might be the one you can reach quickly, not the one that looked best on paper a week earlier.
Best practice: Decide on a primary site and a backup region before eclipse day, then make the final call from live weather.
If the forecast is poor, don't keep pretending it will sort itself out. Use the live stream, enjoy the deep partial where you are, or drive to the backup region you already chose. The people who stay flexible tend to salvage the day better than the people who lock themselves into one hotel and one viewpoint.
Travel logistics also matter because August is peak season. That means road congestion, high accommodation demand, and the possibility that the “perfect” site won't be easy to reach at the last minute. The safest plan is the one that still works if your first choice gets crowded or cloudy.
Eclipse Day Step by Step From First Contact to Last
The day starts without fanfare. First contact is easy to miss unless you're already watching through certified glasses, because the Sun still looks almost normal. Keep your glasses on, test your camera battery, and confirm your exact local totality time from the city table before you even think about leaving your lodging.
From partial phase to totality
As the Moon bites deeper into the Sun, the light changes before your eyes fully register the shape change. The ground takes on a strange flatness, shadows sharpen, and the air can cool enough that you notice it. None of that is a signal to remove your filter, it's the warning that totality is getting close.
The moments just before totality are the ones that usually get adrenaline involved. Diamond ring, Baillon's bead, shadow bands, then the bright face disappears completely. That's the brief window when you can remove your glasses and look directly, because the Sun is fully covered.
During totality and the snap back
Once totality begins, don't waste time fumbling with gear. Look up, take the corona in, and only then think about the camera. The view is short, and the temptation to keep working the equipment can steal the moment.
The instant the first bright sliver returns, your glasses go back on and the camera filter goes back on too. That rule is absolute, because the Sun is hazardous again as soon as the photosphere reappears. The end of totality comes fast, and the people who miss it usually do so because they were still admiring the corona after the safe window had already closed.
Before eclipse day, finish this checklist:
- Charge every battery: Cameras, phones, trackers, and any external power banks.
- Verify your horizon: Especially in Spain, where low altitude makes western obstruction a real threat.
- Test your glasses: Make sure the lenses are clean and undamaged.
- Set local time correctly: Use the exact city timing, not a generic national clock.
If you want a reliable place to compare timing, path geometry, safety rules, and city-level planning in one place, visit Total Solar Eclipse 2026 Live before you lock in your itinerary. It's the easiest way to turn a hopeful trip into a plan that works when the sky goes dark.