August 2, 2026
Telescope for iPhone: Solar Eclipse Photography Guide
You're standing in a field on eclipse day with an iPhone in one hand and a telescope in the other, trying to decide whether this is the moment to trust the phone, the optics, or both. That's the problem with a telescope for iPhone setup, it sounds simple until the sky changes fast, the mount starts to wobble, and you've got only a short window to get the shot right. For the 12 August 2026 total solar eclipse in Europe, the right answer depends on which kind of iPhone workflow you've built, not which accessory looked easiest to buy.
Table of Contents
- Choosing Your iPhone Telescope Setup
- Comparing Optical Paths for Eclipse Day
- Solar Filter Safety and Timing
- Mounting and Stabilizing Your Rig
- Camera Settings and Exposure Brackets
- Troubleshooting and Post-Processing
Choosing Your iPhone Telescope Setup
The first mistake people make is treating every telescope for iPhone setup like the same thing. It isn't. If you're trying to photograph the eclipse, you're usually choosing between three different paths, using the iPhone as the camera behind a real telescope, using a dedicated smart telescope that the iPhone controls, or using app-based tools that help you aim and align the instrument. Apple's App Store now hosts multiple telescope-related apps, including the Celestron StarSense Explorer companion app and several telescope apps with releases listed in 2019, 2022, and 2025, which is a good sign that this has become a stable category rather than a passing gadget trend Apple App Store listing.
Practical rule: decide whether you need pointing help, image capture, or both before you buy anything. Mixing those goals is how people end up with the wrong adapter, the wrong mount, and no usable eclipse frame.
The three workflows that actually matter
The iPhone-as-camera route is the most flexible if you already own a telescope, because you're pairing the phone with existing optics and using the phone for framing and capture. The app-assisted route is best when you need help finding the Sun quickly, especially if you're new to telescope pointing. The smart-telescope route makes sense when you want a more automated system with less fiddling in the field, which can matter a lot during a time-critical event.
The market support around these options is real. Independent buying guides have focused on iPhone telescope compatibility, and that tells you there's sustained demand from hobby astronomers and beginners who want a lower-friction entry point than a full camera rig iGeeksBlog buying guide. The key is that these products solve different problems, and the best choice depends on whether you're traveling light, working with a family group, or trying to chase a clean totality shot without wasting setup time.
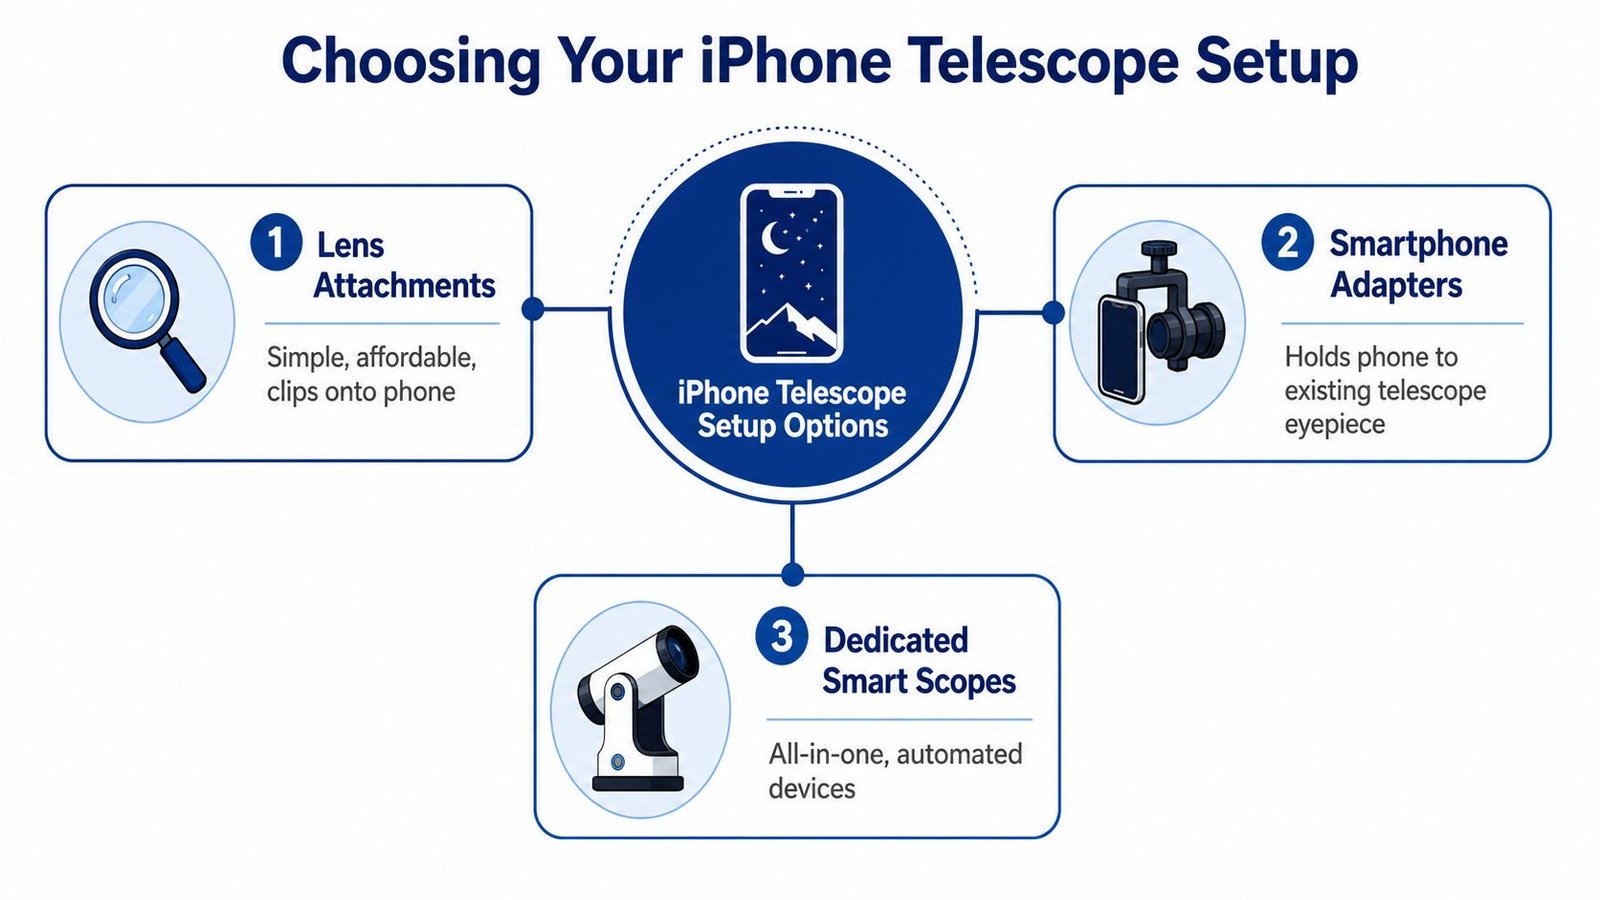
If your goal is eclipse photography, don't overbuy magnification and underbuy stability. A cheap clip-on lens might look portable, but it won't solve the core problem of getting a sharp, steady frame when the Sun is low and the light is changing quickly. For the August 2026 event, the setup you can align fast and trust under pressure is usually the one you'll use.
Camera adapter setup guidance is worth keeping on hand if you're building a phone-behind-eyepiece workflow, because that's the path most choose once they realize app help and image capture are separate jobs.
Comparing Optical Paths for Eclipse Day
A telescope that performs well on casual nights can still be awkward on eclipse day. The problem is not just magnification, it is whether the optics, mount, and phone workflow stay usable when you are aiming at a bright solar target with limited time to adjust. For the 12 August 2026 eclipse, the most useful comparison is between a traditional telescope with app guidance, a dedicated smart scope, and a lightweight adapter-based setup.
What each option does well
| Setup Type | Aperture / Focal Length | Best For | Portability |
|---|---|---|---|
| Celestron StarSense Explorer DX 130AZ | 130 mm / 650 mm | App-guided observing, stronger light gathering, better optical headroom | Moderate, more to carry |
| Celestron StarSense Explorer DX 102AZ | 102 mm / 660 mm | Easier transport, simpler field setup | Better for travel |
| Unistellar EQUINOX 2 | 114 mm / 450 mm | Stable automated capture, fixed-focus smart workflow | Heavier, less handheld-friendly |
| Basic phone adapter on an existing scope | Depends on the telescope | Budget digiscoping, flexible if you already own hardware | Lightest accessory path |
The DX 130AZ gives you a 130 mm aperture, 650 mm focal length, and included eyepieces that yield 26x and 65x, with quoted resolution of 1.07 arcsec by Rayleigh and 0.89 arcsec by Dawes B&H product details. That matters because a phone behind a telescope still inherits the telescope's field of view and vibration behavior, so extra optical headroom gives you more margin when the Sun sits low and the mount is not perfectly still.
The DX 102AZ is easier to carry, with 102 mm aperture, 660 mm focal length, and 26x/66x eyepieces. It is the better travel compromise if you are moving around Spain or Iceland on eclipse day, but it gives up light-gathering power, which can matter once conditions are less than perfect.
A smart telescope like the Unistellar EQUINOX 2 takes a different route. Its 114 mm aperture, 450 mm focal length, fixed focus, battery-powered alt-azimuth mount, 45.6 arcminute field of view, and 9 kg weight point to a system built for stable automated capture rather than grab-and-go mobility Unistellar product data. That makes it attractive if you want repeatable framing and fewer manual errors, but it is not the same thing as a lightweight phone adapter.
A heavier, fixed-focus rig usually beats a tiny travel optic when the wind starts pushing the setup around. The best eclipse image is the one that stays centered long enough to capture, not the one that looked easiest to pack.
A basic phone adapter on an existing telescope still has a place, especially if you already own the scope and only need a way to hold the iPhone behind the eyepiece. It is the cheapest route and the easiest to pack, but it depends heavily on the quality of the base telescope, the rigidity of the adapter, and how much vibration you can control once the phone is attached. That trade-off becomes obvious fast when you are trying to frame a small solar crescent and every touch on the rig shifts the image.
The main choice is simple. Smaller adapter systems are easier to carry, but they are more vulnerable to shake, alignment loss, and weak performance in difficult light. Larger telescope systems demand more setup discipline, but they give you a better chance of holding detail steady enough for the phone to record it cleanly.
Solar Filter Safety and Timing
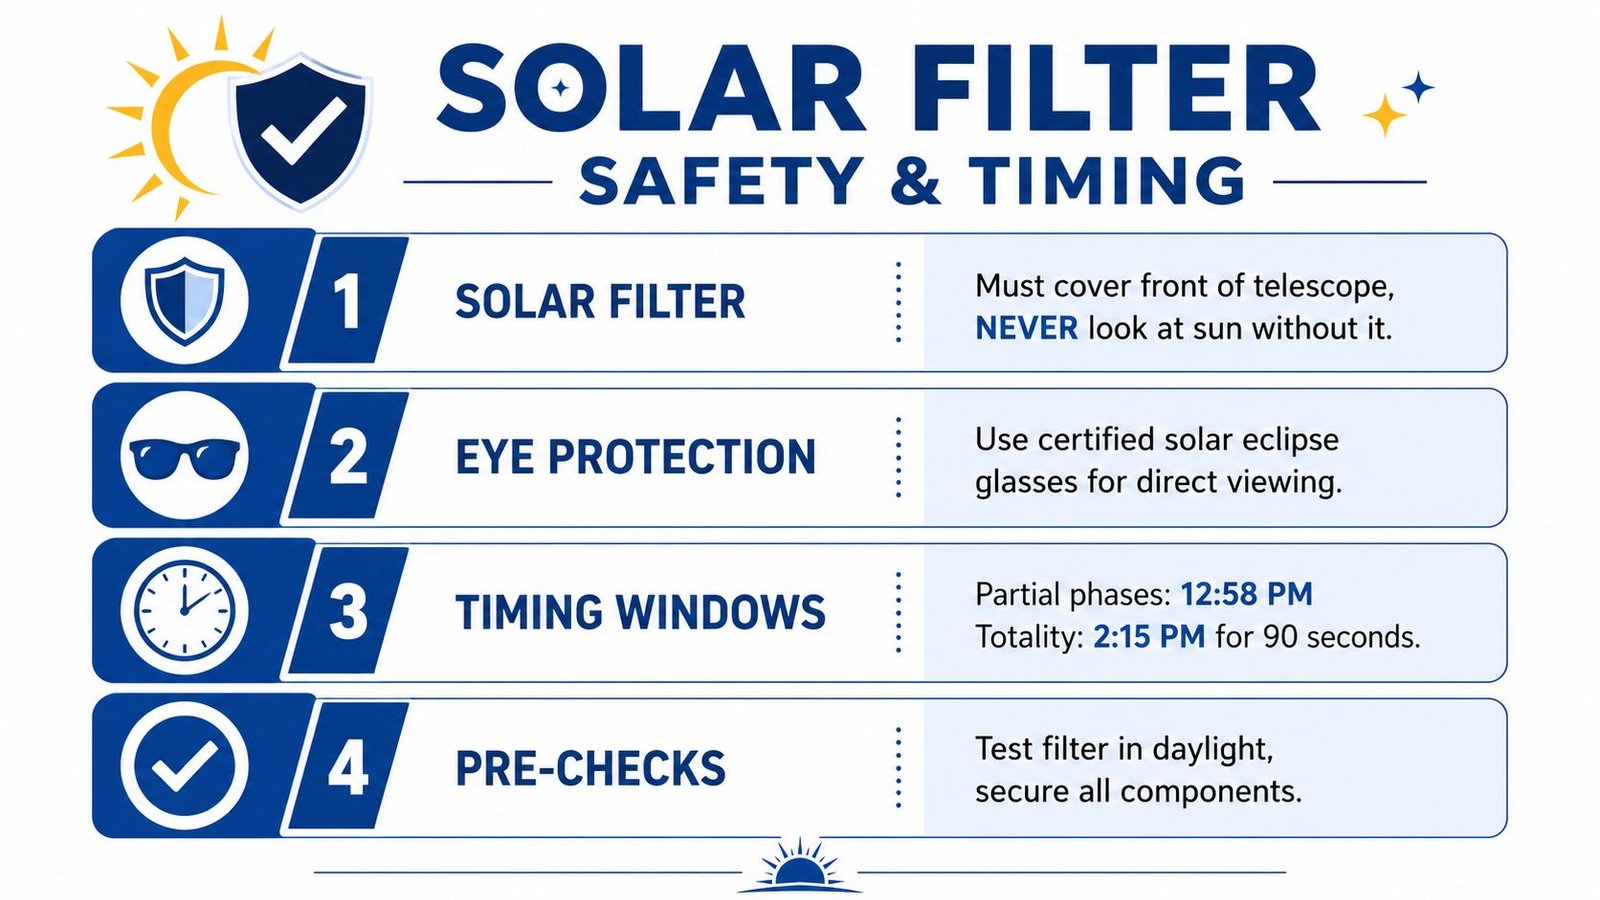
If the filter choice is wrong, everything else is irrelevant. The Sun doesn't care that you brought the right app or mounted the phone carefully, and neither does your iPhone's sensor. During the partial phases, you need ISO 12312-2 certified eclipse eyewear for direct viewing and a proper solar filter on the telescope's front end, not an improvised piece of dark plastic or random “solar film” cut to size eclipse safety guidance.
The filter stays on until totality ends
The rule is strict. The filter stays on during every partial phase, and it comes off only during the brief window of totality, then goes back on as soon as the Sun starts reappearing. That sequence isn't optional, because the safety margin disappears the moment bright photospheric light returns.
For a smartphone telescope setup, the safest routine is to mount and align everything with the solar filter already in place, confirm the target framing in daylight, and then leave the filter alone until the eclipse reaches totality. If you're using any kind of adapter or smart scope, test all of it well before the event so you're not discovering loose hardware while the Moon is already covering the Sun.
Spain adds a practical wrinkle. The totality there happens low in the west, with the Sun at roughly 10 to 12 degrees of altitude near sunset, so haze, terrain, or buildings can change the view fast. That low-angle geometry makes exposure judgment harder, because your camera can be fooled by atmospheric brightness even when the actual solar target is still intense. This is exactly why the brief recommends a low western horizon and careful site selection.
The biggest mistake is thinking a filter is just for eyesight protection. It also protects your capture process, because a filtered image is easier to frame, less likely to blow out, and less likely to tempt you into reckless exposure changes at the wrong time. During partial phases, the telescope should never point at the Sun without the filter fully secured.
Use a certified setup, keep your hands off the filter during the partial phases, and make your removal timing deliberate. That's the difference between a clean capture sequence and a panicked one.
Mounting and Stabilizing Your Rig
The enemy here is vibration, not magnification. A phone clamped to a telescope can look solid on a kitchen table and still wobble badly outside once the wind starts moving or your hand brushes the mount. If you've ever tapped the screen and watched the target jump out of frame, you already know how unforgiving this part is.
Build the rig before eclipse day
Start by attaching the iPhone to the eyepiece with a universal adapter that grips tightly enough to stay centered. Then balance the telescope so the weight of the phone doesn't pull the tube off axis, because even a small imbalance can create drift that shows up at the worst possible moment. A sturdy alt-azimuth mount is the right kind of support for this kind of quick solar work, since you care more about fast aiming and smooth repositioning than about long equatorial tracking.
Practical rule: if you can't keep the Sun centered while gently nudging the mount, the rig isn't ready for totality.
Focus should be locked before the eclipse reaches its most dramatic phase. Use the Sun's limb or a bright filtered view to get the sharpest edge you can, then stop touching the focus knob unless you absolutely have to. The less you do in the last minute before totality, the better your chance of getting one clean frame instead of three blurry attempts.
The low western horizon matters here too. In Spain, a bad site choice can be just as damaging as a bad adapter, because hills, trees, and buildings can block the view exactly when the geometry gets tight. That's why the best tripod position is the one that gives you a clear western line of sight, not the one that feels level.
If you're working with a phone-only telescope adapter, keep expectations realistic. Tiny optics around 21 mm objective size and about 8x magnification are fine for casual distant viewing, but they're not built for stable eclipse imaging in weak light or with movement in the setup Unistellar product data. The larger the optics and the more solid the mount, the less time you'll spend fighting the equipment.
Camera Settings and Exposure Brackets
A telescope on an iPhone gives you very little room for error once the sky starts changing fast. During an eclipse, auto mode usually guesses wrong because it is trying to balance the dark Moon, the bright corona, and the dimming sky near sunset at the same time. Manual control, locked focus, and a phase-by-phase plan keep the setup usable when you do not have time to fiddle with it.
Use different settings for different moments
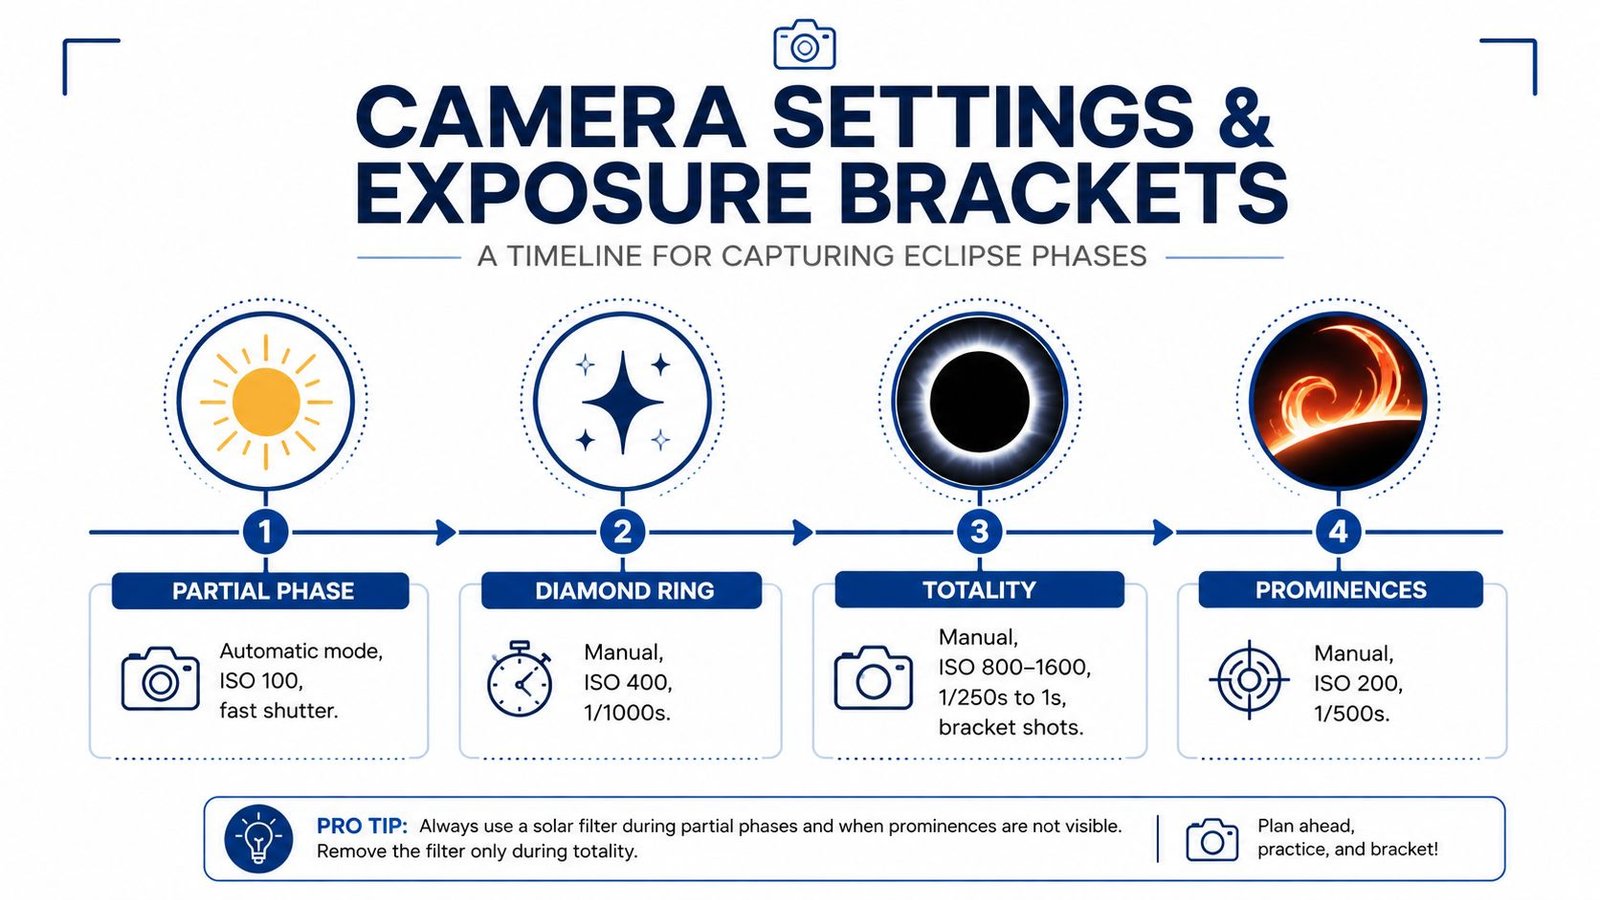
During the partial phase, leave the solar filter in place and use short exposures. The goal is a clean solar disc with controlled detail, not a bright frame that looks good on the phone screen but gives up structure. Third-party camera apps that support manual focus, long exposure control, and RAW output are the practical choice here, because the built-in app often does not give enough control for a telescope-mounted shot Planetary Society imaging guidance.
The short window around totality needs a different approach. You are no longer trying to suppress the Sun's brightness, you are trying to capture the corona, prominences, and the diamond-ring transition before the light comes back. A bracketed sequence gives you usable options later, since no single setting will handle every part of the scene equally well.
Spain makes the timing tighter than many eclipse setups. Near the western horizon, the Sun sits low enough that atmospheric softness and local haze can steal contrast quickly, and a site with hills, trees, or buildings in the way can ruin the shot just as surely as a poor adapter choice Spain geometry note. Around sunset geometry, a fast shutter still matters because it helps fight vibration from the phone and mount, but if you go too aggressive, the faint outer corona disappears with the extra light loss.
Set your plan by phase before the event starts.
- Partial phases: Keep the filter on, use manual control if available, and stay conservative with exposure.
- Diamond ring moment: Expect a bright flash that rewards quick capture more than editing later.
- Totality: Shoot a burst of bracketed frames so you have choices when you review them.
- Prominences and inner corona: Use a few exposure levels instead of trusting one frame.
If your app allows presets, build them before eclipse day and test them in daylight. That saves time when the view turns critical. You should be tapping to switch phases, not searching through menus while the sky is changing.
For the next step in processing, the easiest files to work with are the ones you already exposed cleanly in the field. A good bracket set gives you room to choose the frame with the best corona, the cleanest prominence detail, or the least visible shake. If you plan to stack later, start with a workflow that is built for astronomy-style blending, such as the tools covered in astronomy photo stacking software.
Troubleshooting and Post-Processing
Something usually goes wrong, and that's normal. A clamp slips, the mount drifts, the app loses connection, or the first frame comes out brighter than expected. The fix is to keep the rescue steps simple enough that you can execute them in the few seconds you have.
Fast fixes in the field
If the image drifts, stop touching the phone first and correct the mount second. Most alignment problems get worse when you keep re-centering through the screen instead of resetting the hardware. If the app freezes or connectivity drops on a smart telescope, fall back to the last stable framing and keep shooting rather than trying to rebuild the whole setup mid-event.
Overexposed frames are often a timing problem, not a camera problem. If the exposure looks washed out, reduce the brightness quickly and keep the filter discipline tight during the partial phases. The goal is to salvage usable detail, not to make every frame look identical.
After the eclipse, the work starts in post-processing. Stacking multiple frames can reduce noise and help bring out the faint outer corona, especially when you've captured several RAW files with slightly different exposures. For software, it helps to use tools built for astronomy-style stacking and blending, not just general photo apps, because they handle multiple eclipse frames more gracefully astronomy photo stacking software.
Color correction matters too. Solar prominences often look better after a careful pass on contrast and hue, but don't push the image until it looks synthetic. A good eclipse edit still needs to feel like something you saw at the eyepiece.
The best recovery plan is to assume at least one thing will fail and prepare for it. Bring a backup adapter, save a second camera preset if your app allows it, and keep your editing workflow simple enough that you'll finish it after the trip. If you do that, a rough-looking raw capture can still become a strong final image.
If you're planning to use a telescope for the 2026 eclipse, Total Solar Eclipse 2026 Live gives you the city-by-city timing, path detail, and safety context that make the gear choice worthwhile. Visit Total Solar Eclipse 2026 Live to match your iPhone setup to the actual eclipse geometry, then build your shot plan before the sky gives you no time to think.