July 23, 2026
Camera Adapters Telescope Guide for Eclipse Photography
The first eclipse morning in Europe always starts the same way for me, with a camera body on the table, a T-ring in one hand, and a telescope adapter I've checked three times because there's no room for guesswork once the Sun gets low. For the August 12, 2026 solar eclipse in Europe, the margin for error shrinks fast, especially when you're trying to hold a clean frame on the horizon and catch the corona or the diamond-ring moments without fighting the gear. The right camera adapters telescope setup decides whether you spend the event making images or chasing missed focus and loose threads, and the safest planning starts long before the sky darkens. What a solar eclipse is and why geometry matters
Table of Contents
- Introduction
- Understanding Telescope Camera Interfaces
- Selecting the Right Camera Adapter
- Mounting Cameras on Telescopes
- Ensuring Correct Backfocus and Focus Solutions
- Solar Filter Use and Eclipse Exposure Tips
- Troubleshooting Adapter Compatibility and Final Tips
Introduction
A lot of eclipse setups fail before the first contact because the adapter looked compatible in a product photo but didn't match the telescope side, the camera side, or the available backfocus. That's especially frustrating when the Sun is sitting low and you've got only a narrow window to frame the event cleanly against the horizon. The practical answer is a stable, verified mechanical chain from camera to telescope, with the shortest path that still reaches focus and keeps the filter system secure.
For eclipse work, the adapter isn't just a convenience part. It's the piece that turns a telescope into the imaging optic and keeps the camera sensor exactly where the telescope expects it. If the interface is wrong, you lose sharpness, stability, or both, and those problems show up fastest when you're working near sunset geometry.
Understanding Telescope Camera Interfaces
The standard that still anchors most setups
The backbone of telescope-camera mounting is the T-thread/T-mount standard, which uses a 42 mm diameter thread with a 0.75 mm pitch. That standard remains the baseline for prime-focus attachment because it lets a camera body connect through a T-ring and then to a telescope-side adapter without adding a camera lens into the optical path, which is exactly what most eclipse photographers want. The mechanical idea is simple, standardized coupling between two systems that were originally built for different jobs, cameras for lenses and telescopes for the sky, and that's why the same M42/T-thread format keeps showing up across astronomy accessories. A primer on T-rings and T-adapters for astronomy and astrophotography
A clean prime-focus rig usually starts with a camera body, then a camera-specific T-ring, then a telescope adapter that fits the focuser or visual back. That workflow matters because every extra optical element can complicate focus, stability, and field cleanliness, which is exactly what you don't want when the eclipse is happening low over a western horizon.
Matching the telescope side to the camera side
On the telescope end, the most common mechanical fits are 1.25-inch and 2-inch nosepiece-style adapters. Those sizes matter because they determine how securely the adapter locks into the focuser and how much mechanical support the camera train gets once the rig is hanging off the back of the telescope. A stronger fit usually means less wobble, and less wobble is worth more than cosmetic convenience when you're dealing with a narrow eclipse frame.
On the camera end, the key is matching the correct mount to the body, whether that means EOS, FTZ, T2, or another camera-specific T-ring. The telescope doesn't care about your camera brand, it cares about spacing and thread compatibility. That's why standardization has held up so well for camera adapters telescope setups, it removes uncertainty from the part of the rig that can't afford uncertainty.
| Adapter Type | Telescope Side | Camera Mount | Backfocus (mm) | Best For |
|---|---|---|---|---|
| T-ring prime-focus adapter | 1.25-inch or 2-inch focuser | Camera-specific mount | Depends on the full train | DSLR and mirrorless prime-focus work |
| Eyepiece projection phone adapter | Eyepiece holder or clamp-on bracket | Smartphone clamp | Varies by eyepiece and clamp | Portable eclipse snapshots |
| Low-profile nosepiece adapter | 1.25-inch or 2-inch focuser | T-thread chain | Short optical path | Tight focus travel and compact rigs |
Practical rule: if you can reach focus with a shorter, cleaner train, take it. Every extra connector is another chance for tilt, slip, or thread mismatch.
Selecting the Right Camera Adapter
Prime focus or phone clamp
The first decision is whether you're building a direct prime-focus setup or using a smartphone behind an eyepiece. Smartphone adapters are widely used for eclipse imaging because they hold the phone behind the eyepiece, but they add alignment sensitivity and vibration risk that prime-focus T-ring setups avoid. For casual eclipse snapshots, that trade-off can be acceptable. For a clean, repeatable imaging rig, prime focus is usually the more disciplined choice.
A direct camera setup is the better fit when the telescope has enough backfocus and you want the most stable optical path. A phone clamp makes more sense when portability matters more than optical cleanliness, or when you're working fast and don't want to rebuild the train around a camera body. I've seen smartphone brackets work well for public outreach, but they're much less forgiving once someone nudges the tripod or the Sun drifts toward the edge of the field.
What to check before buying
The adapter should match three things, telescope side, camera side, and available spacing. Material quality matters because cheap threads can loosen or bind, and a bad fit usually shows up at the worst time, after setup, when the sky is already changing. Profile length matters too, because a bulky adapter can steal the travel you need to reach focus.
For filter compatibility, check whether the adapter or eyepiece holder has the right threads for the solar filter system you plan to use. I also prefer a design that locks positively with thumbscrews or a compression ring, because the eclipse setup often gets carried, angled, and re-centered several times in the field.
A simple sourcing rule works well in practice:
- Choose prime focus if your camera has the right T-ring and you want the cleanest, most stable imaging train.
- Choose a smartphone adapter if you need speed, portability, and don't mind extra alignment fuss.
- Choose 1.25-inch hardware when the rig needs a compact fit and the telescope's focuser is already matched to that size.
- Choose 2-inch hardware when you want a sturdier interface and the telescope supports it without adding unnecessary restriction.
If you're using a planning tool for the eclipse, a site like Total Solar Eclipse 2026 Live can help with timing and location context, while the adapter choice still has to be made around your exact telescope and camera. It's the gear match, not the calendar, that decides whether your frame is sharp.
Mounting Cameras on Telescopes
DSLR and mirrorless prime-focus assembly
The working sequence for a DSLR or mirrorless camera is straightforward. Remove the camera lens, attach the correct camera-specific T-ring, then thread on the prime-focus adapter before inserting the assembly into the telescope focuser and locking the thumbscrews. That basic workflow is still the one that holds up in the field because it's mechanically simple and doesn't depend on the camera lens staying in place.
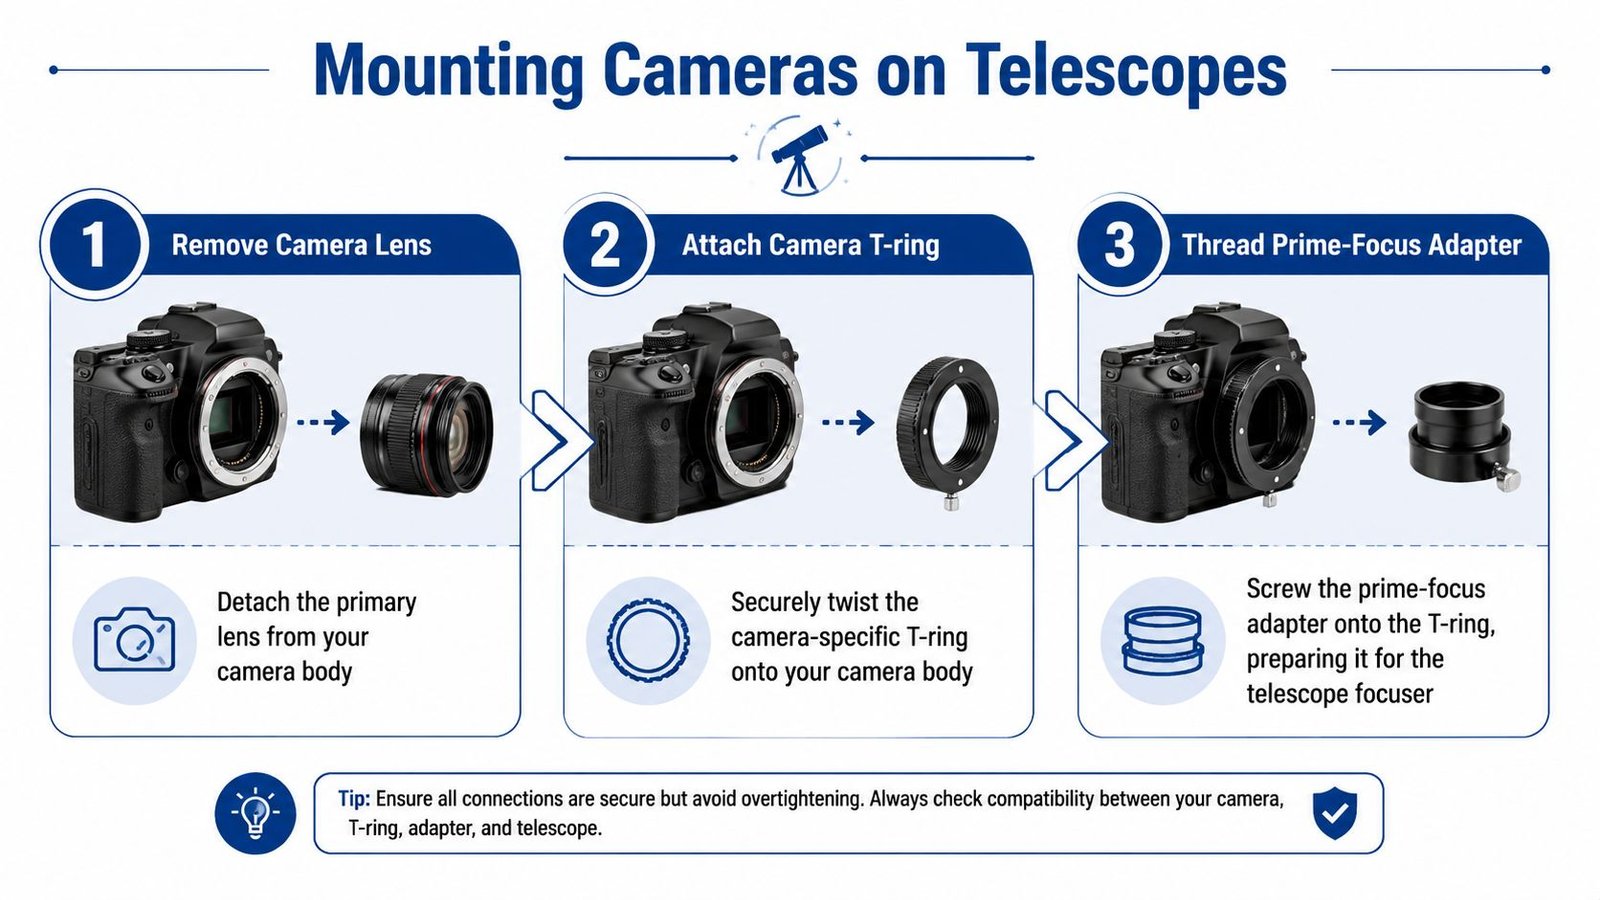
A good mount feels boring once it's correct. The camera doesn't sag, the adapter doesn't rotate when you touch it, and the focuser doesn't complain under load. That's what you want for eclipse day because you'll already be managing solar filters, framing, and changing light.
Lock the mechanical chain before you start chasing focus. A loose adapter will make every other problem look worse than it is.
Once the camera is on, balance the rig before pointing near the Sun. A telescope with a camera hanging off the back can shift weight enough to make the mount feel sloppy, especially with a long adapter train. If the mount is on a tracking head, don't trust the first center position, re-check it after the camera is attached and again after the filter is in place.
Smartphone setup behind an eyepiece
A phone clamp behind an eyepiece is the fast way to get a solar shot when the setup needs to stay compact. The phone has to sit square to the eyepiece, and the clamp should hold it without flexing, because any tiny skew shows up as edge vignetting or a drifting bright spot. Keep the phone interface as tight as possible, and don't chase perfect centering by hand once the rig is live.
The main limitation is vibration. Every tap on the screen can move the frame, and every small bump in the tripod can shift the image enough to ruin fine structure. That's why phone adapters are good for quick eclipse documentation, but less satisfying when you're trying to capture a clean, repeatable solar edge with minimal fuss.
Auto-tracking telescope guidance for steadier eclipse framing
A quick field discipline checklist
- Seat every thread fully: Cross-threaded parts are hard to rescue once they've started binding.
- Lock the focuser gently but firmly: Enough to prevent slip, not so hard that you deform the fit.
- Check the camera orientation: A tilted sensor can turn a usable frame into a frustrating crop.
- Test touch response: If the rig moves when you press the shutter, use a remote release or timer.
Ensuring Correct Backfocus and Focus Solutions
Why focus runs out on many rigs
Prime-focus work fails most often because the telescope can't place the focal plane where the camera sensor needs it. Many telescope-camera adapters use only 12 mm or less of optical path, and that short profile is helpful for compactness, but it also means the rest of the train has to be built carefully. If inward focus isn't enough, the telescope will not bring the image to a sharp point at the sensor.
The cleanest fix is to keep the adapter train short and controlled. When a DSLR or mirrorless setup needs specific sensor-to-thread spacing, the common issue is that the camera body, T-ring, adapter, and any spacers together don't land on the focal plane. That's when the fit looks right on the outside but still won't focus on a bright star.
What actually solves the problem
A Barlow lens is a common workaround because it shifts the focal point rearward. Extension tubes can help when the setup is close but not quite there, and a low-profile adapter can save enough path length to make focus reachable without changing the optical character of the telescope too much. In practice, the easiest diagnosis is simple, if the train is too long or too short, the camera will tell you fast once you try to focus on a bright star in live view.
Field habit: I always test on a bright star before eclipse day, because the Sun will not wait while you discover that your adapter stack is off by a few millimeters.
Use live view, rack focus slowly, and look for the point where star shapes tighten instead of just brightening. If the telescope still can't reach focus after the train is shortened, the Barlow fix is usually the quickest way to push the focal plane where the sensor can catch it.
A practical pre-eclipse focus check
- Assemble the exact camera, T-ring, adapter, and any spacers you'll use in the field.
- Point at a bright star and use live view rather than trusting distance marks.
- Confirm that the focuser has enough travel in both directions.
- If focus is still unreachable, swap in a Barlow or a shorter adapter rather than forcing the drawtube.
Solar Filter Use and Eclipse Exposure Tips
Safe filtering before and after totality
For partial phases, the filter has to be on the telescope before the instrument points at the Sun, and it should stay in place until totality begins and again immediately after totality ends. That rule matters because the telescope concentrates sunlight very efficiently, and an unsecured filter is not a small mistake, it's a real safety failure. During totality, remove the filter only for the brief fully dark phase, then reattach it as soon as the brilliant edge returns.
A solar filter should sit securely on the adapter or the front of the telescope, not float loosely where wind or vibration can lift it. Twist-lock and compression-ring styles are both useful if they hold the filter firmly without stressing the threads. The fit needs to be repeatable, because eclipse day usually means quick changes between filtered partial viewing and unfiltered totality imaging.
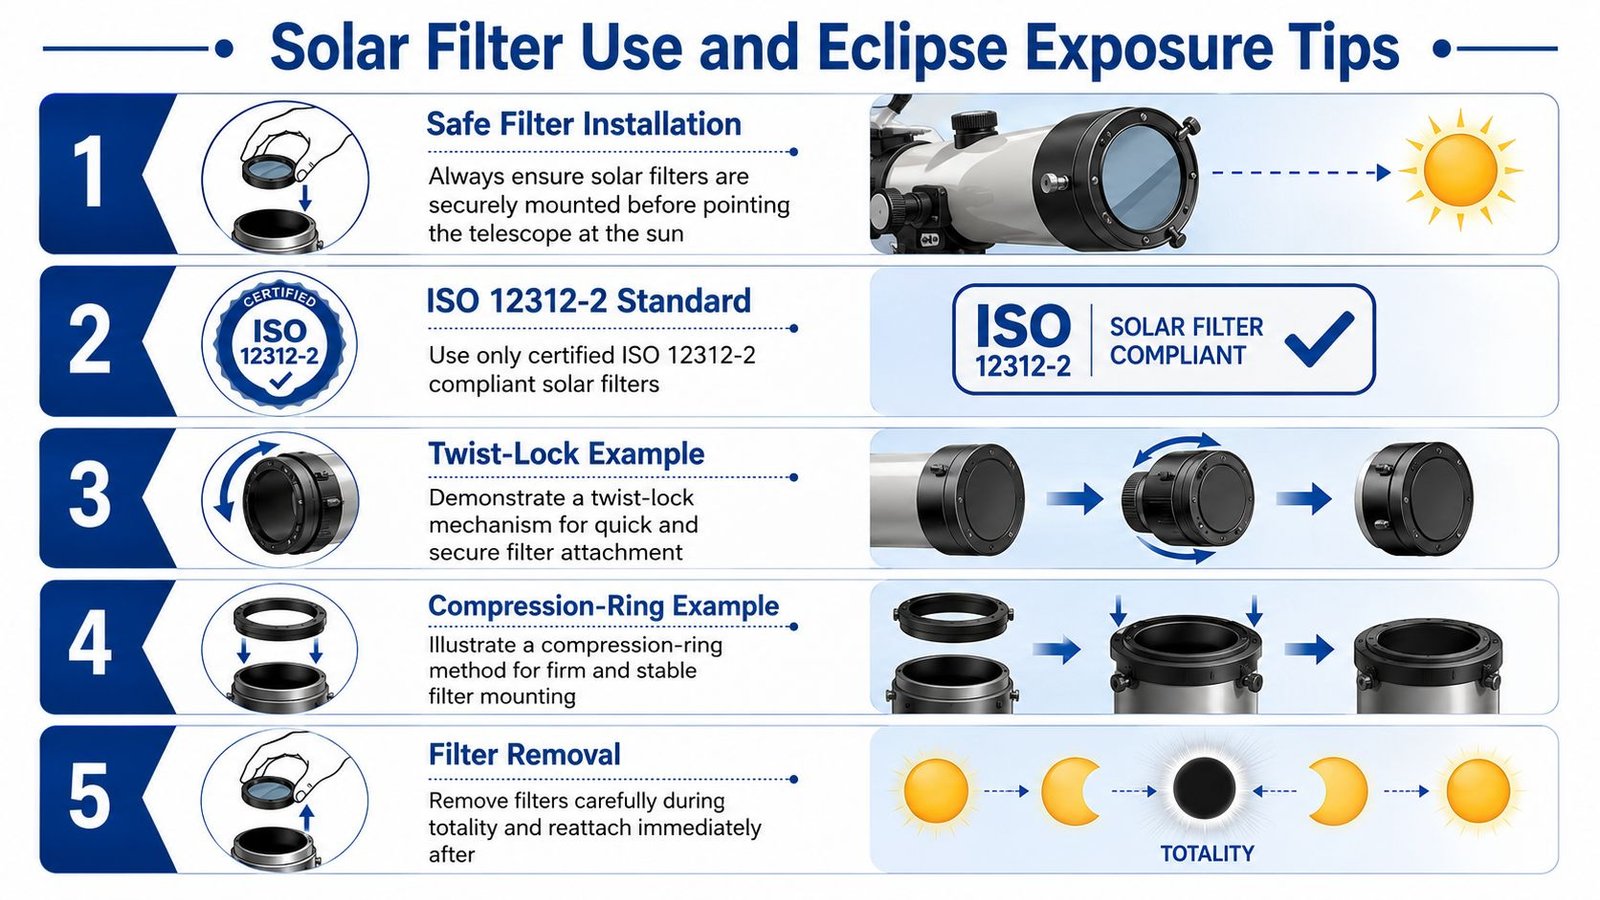
Exposure habits that work in the field
Exposure timing has to stay flexible because the light changes quickly near eclipse contacts and even faster once the Sun is low on the horizon. For the diamond-ring look, short test frames are usually the only sensible move, then you adjust from the histogram and the shape of the bright rim. During totality, the corona rewards careful bracketing and steady framing, while Baily's beads and ingress or egress details need the filter removed or reinstalled at exactly the right time.
The best images usually come from a calm, repetitive sequence rather than one perfect setting. Frame first, lock the filter state, confirm focus, then start exposure testing. If the rig is on a mount that tracks well, the telescope stays where you need it while you watch the sky, which is a huge advantage when the eclipse is happening close to sunset.
Five field rules I trust
- Mount the filter first: Never point at the Sun without the correct filter in place.
- Use only certified solar gear: ISO 12312-2 eyewear and filters belong in the kit.
- Keep removal brief: Totality is the only time the telescope should run unfiltered.
- Watch the horizon: Low solar altitude changes framing and makes careful site choice matter more.
- Review frames fast: Don't wait until after the eclipse to discover a focus or glare problem.
Planning time-lapse capture for the 2026 eclipse
Troubleshooting Adapter Compatibility and Final Tips
Fast diagnosis for common field failures
If the adapter feels wobbly, check whether the telescope side is fully seated and whether the thumbscrews are clamping the nosepiece. If the filter threads don't match cleanly, stop and recheck the thread standard before forcing anything, because thread damage on eclipse day is a terrible way to lose the session. If focus drifts during the event, the train may be slipping under load or the spacing may be close enough to focus only at one position of the drawtube.
A lot of these problems trace back to the same thing, a mechanical fit that seemed good on the bench but wasn't tight enough under field conditions. Many DSLR/T-thread setups require about 55 mm of sensor-to-thread spacing, and if inward focus is still insufficient, a Barlow lens is the easiest fix to shift the focal point rearward. That one fact solves more “why won't this focus?” moments than any amount of guesswork.
What to pack and what to test
Carry spare thumbscrews, a small wrench if your gear uses one, and a compact toolkit that can handle a loose clamp or a slipped adapter. Test every connection before leaving for the site, then test it again after the camera is mounted and the filter is in place. That extra pass is cheap insurance when you're standing in a field with the Sun already dropping toward the horizon.
Bring the setup that already works in daylight. Eclipse day is for using the rig, not designing it.
Keep the final kit boring, short, and mechanically secure. That's the difference between chasing problems and getting the shot.
A CTA for Total Solar Eclipse 2026 Live.