July 12, 2026
Auto Tracking Telescopes for the 2026 Solar Eclipse
You're probably somewhere between excitement and gear anxiety right now. You know the 12 August 2026 total solar eclipse is worth traveling for, especially if you're aiming for Spain or Iceland, but you also know how fast eclipse day gets chaotic. A low Sun, changing weather, crowded roads, uneven ground, cables, batteries, filters, and one short stretch of totality can turn a simple setup into a scramble.
That's why auto tracking telescopes matter so much for this event. For a normal night under the stars, drifting out of frame is annoying. For a sunset eclipse in Europe, it can ruin the one sequence you crossed a continent to see. If you've ever tried nudging a manual mount while also checking exposure, swapping glasses, and watching the horizon, you already know the problem.
The good news is that the right tracking setup removes a lot of that pressure. It won't make clouds disappear, and it won't fix a bad location choice, but it can keep the Sun centered while you focus on timing, safety, and the experience.
Table of Contents
- Your Front-Row Seat to the 2026 Sunset Eclipse
- What Are Auto Tracking Telescopes and Mounts
- Choosing Your Eclipse Tracker Mounts and Methods
- Must-Have Features for Solar Eclipse Tracking
- Mastering Setup and Alignment for the Sun
- Your 2026 Eclipse Go-Bag Checklist and Troubleshooting
- Final Preparations and Eclipse Day Success
Your Front-Row Seat to the 2026 Sunset Eclipse
You reach a hillside in northern Spain with time to spare, but the pressure starts early. The Sun is already sinking toward the western horizon, people are shifting tripods to avoid rooftops and trees, and every small mistake now will matter more later. A sunset eclipse gives you less room for error than a high noon event because the target keeps dropping into thicker air and closer to whatever blocks your view.
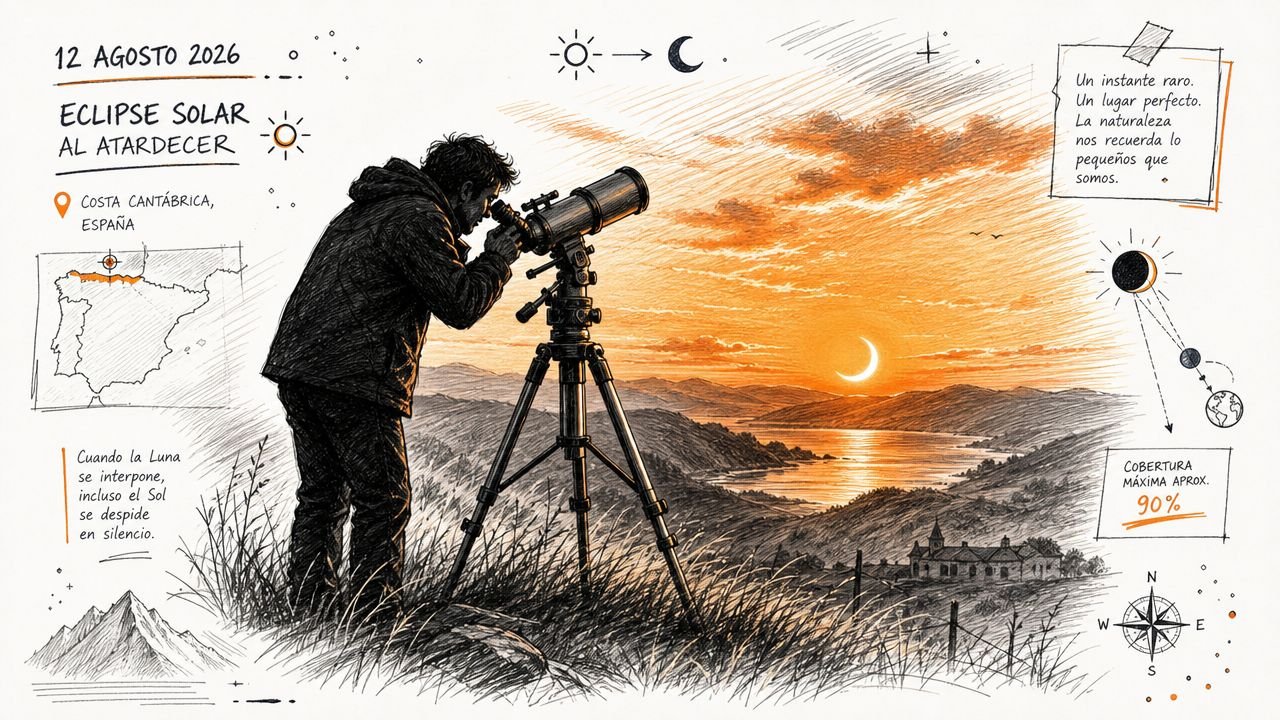
That is why an auto tracking setup matters so much for 2026. It is not just about comfort. It helps you keep the Sun centered while you check focus, change magnification, or glance up and watch the event instead of constantly nudging the mount by hand.
If you want the short version, sunset eclipses punish delay. A tracker buys back attention.
For many eclipse travelers, it helps to refresh the geometry before choosing gear. A quick review of how solar and lunar eclipses work makes the later decisions easier, especially once you start thinking about line of sight, contact times, and how little sky remains above the horizon near the end.
Spain and Iceland ask different things from your gear
Spain and Iceland sit under the same eclipse path, but they do not ask the same job from your setup.
In Spain, the big challenge is low-altitude tracking near sunset. Your mount has to follow the Sun smoothly while it sits in murkier air, closer to hills, buildings, sea haze, and uneven ground. A tracker that behaves well in a backyard test at midday can become awkward fast when the tube is pointed low and the tripod needs one more small adjustment.
Iceland often shifts the problem from horizon clutter to travel logistics and fast deployment. Many observers will be working in a place where wind, cold fingers, and uneven terrain can turn a fussy setup into lost observing time. The upcoming 2026 eclipse is expected to draw attention to west-facing coastal locations there, so portability and quick alignment matter just as much as raw tracking accuracy.
The shared lesson is simple. You want the mount doing the boring work while you handle the parts that need human judgment.
A good tracking mount protects your concentration first, and your framing second.
What goes wrong without tracking
A manual mount can be fine for a quick look at low power. The trouble starts when you add a camera, increase focal length, or try to keep the Sun placed neatly in the field while the light is changing.
The drift surprises people. Earth's rotation is steady, but your corrections are not. Near the horizon, every touch feels larger because you are also fighting tripod position, awkward eyepiece angles, and the temptation to reframe the scene against the sunset. It is like trying to keep a boat lined up with a dock while the tide keeps moving and other people are brushing past you.
Auto tracking telescopes cut that workload down to something manageable. For the 2026 eclipse, especially in Spain and Iceland, that can be the difference between scrambling through the best moments and seeing them.
What Are Auto Tracking Telescopes and Mounts
An auto tracking telescope is really two things working together. First, there's the optical tube, lens, or small telescope that gathers the image. Second, there's the motorized mount, which is the part that moves. If you remember that split, most of the jargon gets easier.
Think of the mount as a camera operator that never gets tired. Its job is to make tiny corrections so the target stays centered while Earth rotates.
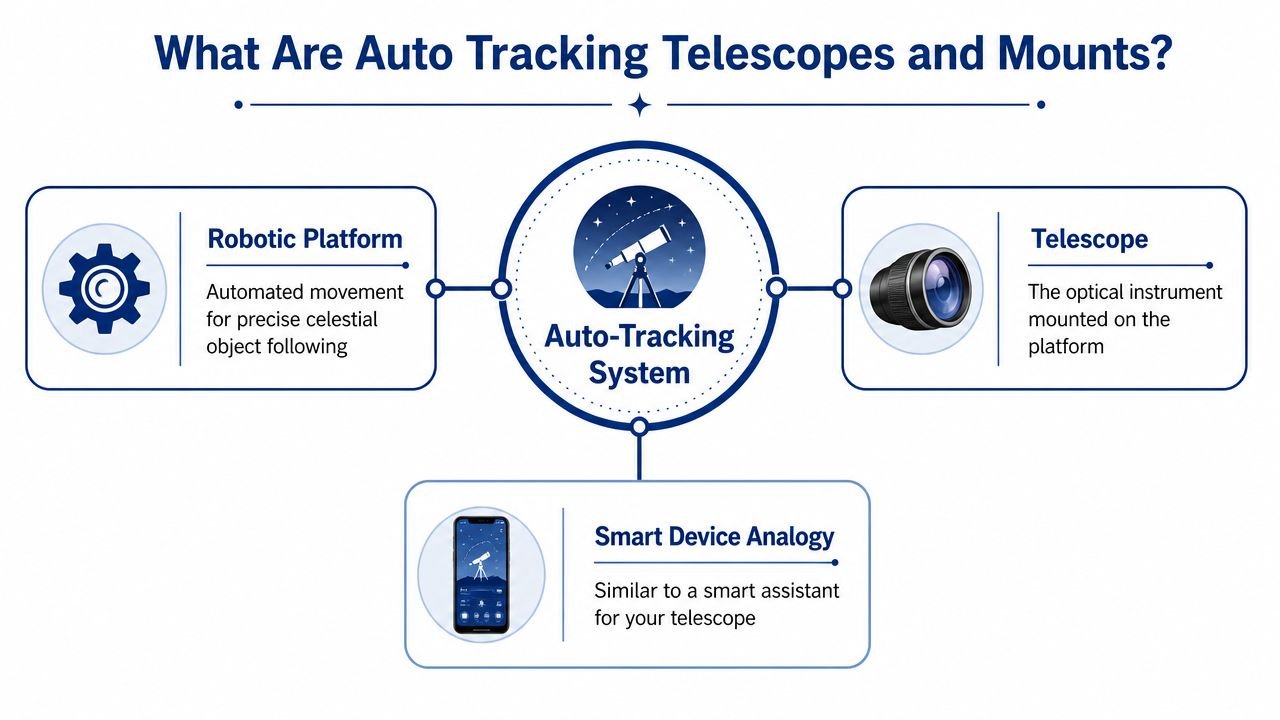
The mount does the work
When people say a telescope “tracks,” they usually mean the mount has motors and control software. Those motors move in small increments to counter the sky's apparent motion. Without tracking, the Sun or stars drift through the eyepiece and out of frame. With tracking, the mount keeps following.
A practical way to picture it is a phone gimbal that keeps a walking subject centered. The telescope itself doesn't know where to move. The mount and controller do.
Practical rule: If you're shopping for eclipse gear, ask about the mount first and the optics second. A great telescope on a weak or confusing mount is still a stressful eclipse setup.
The telescope and the tracker are not the same thing
A common point of confusion for buyers involves mounts. A refractor, a Maksutov, or a smart telescope body can all sit on different kinds of mounts. Some are manual. Some are computerized. Some can find objects. Some only track after you point them correctly. Some do both.
Here's the simplest breakdown:
- Manual telescope: You move it yourself. You keep correcting by hand.
- Motorized tracking mount: It follows once aligned.
- GoTo system: It can point to selected targets, but usually needs setup and alignment first.
- Smart telescope: It combines optics, motors, sensors, and software in one integrated package.
A short history that matters
Modern eclipse gear didn't appear out of nowhere. The first major milestone of full remote automation came in 1975, when a 0.75-meter telescope was automated to track targets through a microwave link without an observer present, as described in Planewave's history of Fairborn Observatory. That architecture became the template for later robotic observatories and, in simplified form, the consumer systems people travel with today.
That history matters because it explains why tracking is more than a convenience feature. It grew out of a need for repeatable, accurate, unattended pointing.
What the controller actually changes
The “brain” of the system may be a hand controller, a built-in computer, or an app on your phone. It handles things like:
- Target position based on time and location
- Motor commands that keep motion smooth
- Alignment routines so the mount knows where it is pointed
- User control for centering, slewing, and tracking mode changes
For eclipse use, the key benefit is simple. Once the system is set up properly, you stop chasing the Sun manually and start observing with a calmer workflow.
Choosing Your Eclipse Tracker Mounts and Methods
Not every tracking setup fits eclipse travel. A mount that works beautifully in your backyard can become a burden when you're flying into Spain, driving narrow roads, and setting up on uneven ground with a low western horizon. The best choice depends on how you plan to watch the eclipse, how much imaging you want to do, and how much setup complexity you can tolerate under pressure.
Alt-Az or GEM for eclipse travel
For eclipse chasers, the first big choice is usually between an Alt-Azimuth mount and a German Equatorial Mount, often shortened to GEM.
Telescope Mount Comparison for Eclipse Travel
| Feature | Alt-Azimuth (Alt-Az) Mount | German Equatorial (GEM) Mount |
|---|---|---|
| Motion style | Moves up-down and left-right | Moves on polar-aligned axes |
| Travel setup | Usually faster and simpler | Usually slower and more involved |
| Daytime use | Friendly for visual eclipse viewing | Strong for disciplined imaging workflows |
| Low-horizon repositioning | Easy to adjust on the fly | Can be less forgiving if setup is rushed |
| Field rotation in imaging | Can become an issue during imaging | Better suited to avoid field rotation |
| Best fit | Visual observers and lightweight travel kits | Photographers who want maximum tracking precision |
An Alt-Az mount is often the sensible pick for visual observers and lightweight eclipse imaging. It's intuitive, compact, and less fussy in the field. If you're using binocular-sized optics, a small refractor, or a compact smart telescope, Alt-Az can make travel day much easier.
A GEM asks more from you. It needs polar alignment, and that gets awkward in daylight. But if you're serious about photography and want the cleanest tracking path with fewer rotational issues in your framing, a GEM still earns its place.
GoTo or smart telescope
The second choice causes more confusion than the first. People often hear “auto tracking” and assume every modern scope aligns itself. That isn't true.
A common misconception is that all auto-tracking systems are self-aligning. Traditional GoTo systems require manual alignment on bright stars, while newer smart telescopes use Autonomous Field Detection (AFD) to align automatically. Confusing the two is a frequent source of frustration for beginners, especially eclipse chasers who need a fast, reliable setup, as explained in this video discussion of AFD versus GoTo alignment.
That distinction matters a lot for a sunset eclipse.
A traditional GoTo setup
A classic GoTo mount can be excellent. It often gives you more flexibility, better payload options, and compatibility with many telescope tubes. But it usually expects you to align the system yourself. At night, that may mean bright stars. In daylight, that gets trickier.
You'll need more familiarity, more patience, and often a more deliberate setup routine.
A smart telescope setup
A smart telescope usually reduces the number of separate parts. You're not pairing a random optical tube with a separate mount, controller, battery, and software stack. The device is built as one system. That's attractive for travelers who want speed.
If your main goal is to see and record the eclipse with the least stress, fewer moving parts often beats theoretical flexibility.
Which one fits your trip
Use this quick decision guide:
- Choose Alt-Az if you want a lighter, simpler setup and your main goal is visual observing or straightforward eclipse imaging.
- Choose GEM if you already know equatorial workflow and you care about cleaner long-sequence imaging.
- Choose traditional GoTo if you want modular gear and you're comfortable with manual alignment routines.
- Choose a smart telescope if setup speed, portability, and self-guided alignment matter more than tinkering.
For most first-time eclipse travelers, the mistake isn't buying “too little” telescope. It's buying too much system. Heavy gear, extra cables, and a steep alignment routine create failure points you don't need on eclipse day.
Must-Have Features for Solar Eclipse Tracking
Many tracking mounts are fine for casual astronomy but awkward for solar work. An eclipse exposes those weaknesses fast. The Sun is bright, the setup happens in daylight, and a Europe trip means you may be working from a cliff edge, roadside pullout, or windy overlook with no mains power and little time to recover from mistakes.
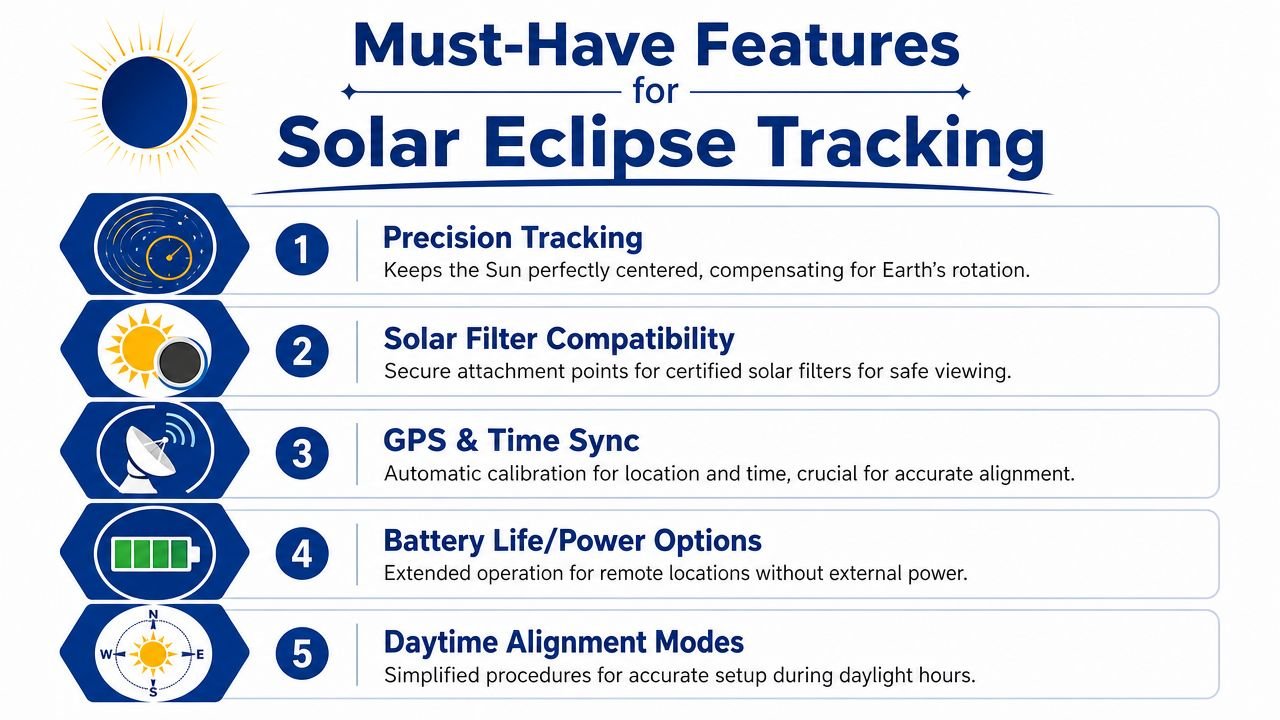
What matters most for the Sun
A mount for eclipse work should first be judged by how reliably it can keep the Sun centered in the daytime. That sounds obvious, but buyers often focus on deep-sky features that don't help much at sunset.
Here's the checklist I care about most:
- Precision tracking: The mount needs smooth motor control, not jerky corrections that shake the image at higher magnification.
- Solar filter compatibility: Your scope must accept a secure front-mounted solar filter. If the filter fit feels improvised, the system isn't ready.
- Daytime alignment options: Night-oriented systems can become frustrating when you can't rely on a normal star alignment routine.
- GPS and time sync: Automatic time and location entry remove one easy-to-miss source of setup error.
- Reasonable payload headroom: The mount should carry the telescope, camera, and filter without sounding strained or feeling top-heavy.
A good solar setup also deserves a fresh review of eclipse safety basics, especially if you'll be switching between visual viewing and photography.
A tracker that barely handles your load in calm conditions often becomes unreliable when the wind picks up or the tripod is standing on rough ground.
Travel features that save the day
Travel changes the feature list. In your backyard, a bulky battery or extra counterweight may be annoying. On an eclipse trip, it can be the reason you miss setup time.
Look for these practical details:
- Battery flexibility. USB charging or easy external power options reduce panic if internal power drops.
- Compact tripod footprint. Spain viewing sites may be crowded. You don't want a giant stance that forces constant repositioning.
- Quick assembly. If weather shifts and you relocate, the mount should go from bag to tracking without a long rebuild.
- Simple control app or hand unit. Under pressure, clean menus beat feature-packed clutter.
Why daytime usability matters so much
At night, you can usually troubleshoot calmly. During a solar eclipse, the clock keeps moving and every mistake happens in full daylight with the Sun still heating your gear and your own attention split across safety, framing, and the crowd around you.
That's why the best auto tracking telescopes for this eclipse aren't always the most advanced ones on paper. They're the ones you can set up accurately, repeatably, and fast.
Mastering Setup and Alignment for the Sun
Daytime alignment is where many otherwise solid eclipse plans start to wobble. A mount can have excellent tracking motors and still disappoint if you can't get it aligned cleanly before first contact. Solar setup is different from nighttime astronomy because your usual reference stars may not be available, and in Spain the low western Sun adds a final layer of difficulty.
A visual guide helps here:
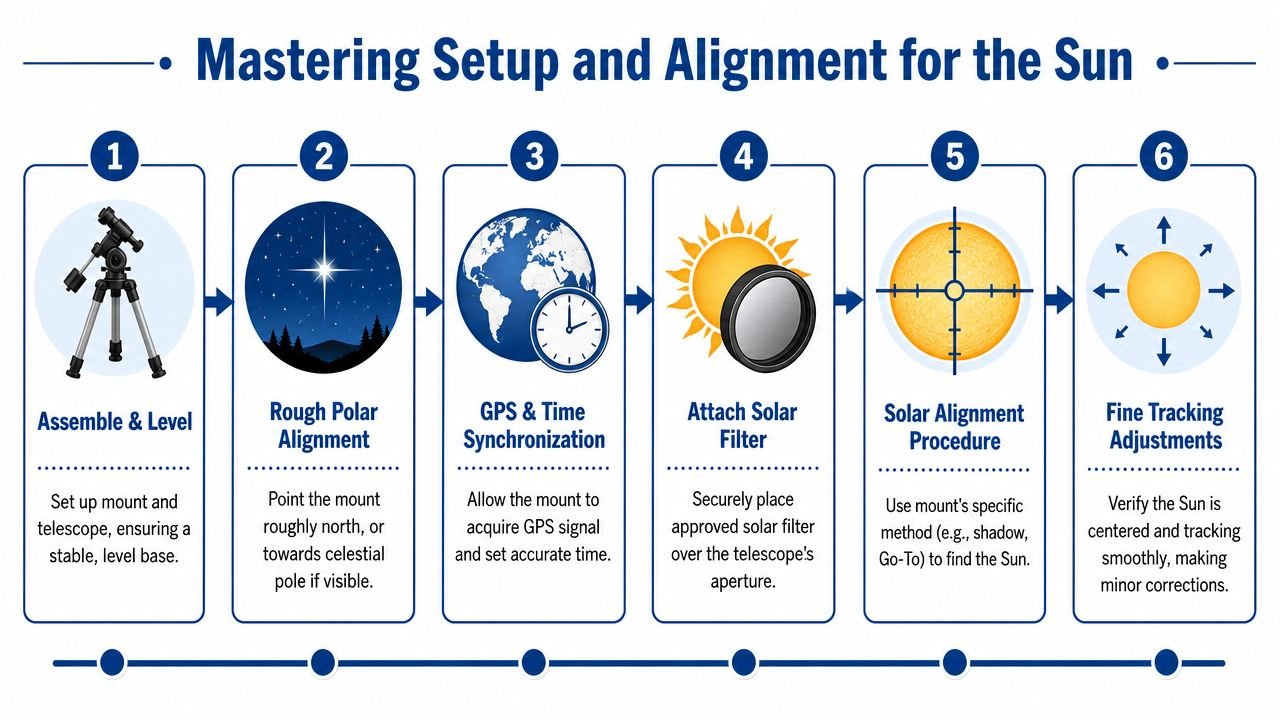
A safe daytime alignment routine
Start with the boring parts. They're what make the rest work.
Level the tripod carefully
A sloppy base makes every later adjustment harder, especially on uneven coastal ground.Set the mount in its home or zero position
Do this before you rush into finding the Sun.Confirm time and location
If your system has GPS, let it settle. If it doesn't, enter the data carefully.Attach the solar filter before pointing anywhere near the Sun
This is not optional.Use the mount's solar finding method
Some systems use software routines. Others rely on rough positioning, shadow alignment, or a pre-approved solar finder.Center the Sun and watch it for a few minutes
Don't trust a single moment of success. Let the tracking prove itself.
Later in your prep, it helps to review a visual example of solar motion and framing. This time-lapse walkthrough is useful for thinking about how the Sun moves across your composition during the event:
If you want another framing reference before the trip, this solar eclipse time-lapse page can help you think through motion, timing, and sequence planning.
Low-altitude eclipse problems in Spain
Spain's track is special because the eclipse happens with the Sun low in the west near sunset. That creates three practical issues.
First, your horizon matters more than your telescope. A ridge, trees, low clouds, or sea haze can beat the fanciest mount in the world.
Second, small leveling errors show up fast when the target is already near the horizon. A setup that feels “close enough” at noon may drift annoyingly during the event.
Third, repositioning gets harder. If you have to shift left a few meters to clear a building or parked van, a compact mount pays off.
Test your exact eclipse workflow in daylight before the trip. Don't treat the eclipse as the first time you try solar alignment, app control, or filter attachment.
If you use a GEM in daylight
A GEM can work beautifully, but only if you already understand it. You may not have a clear view of Polaris, and local terrain can hide your northern horizon. In that case, rough polar setup, accurate leveling, and a patient solar alignment routine matter more than perfection.
There's a reason professionals moved so heavily toward robotic tracking. By 2004, robotic telescope observations accounted for the overwhelming majority of published data on asteroid orbits and variable stars, according to the robotic telescope overview. The lesson for amateurs isn't that you need an observatory. It's that repeatable tracking accuracy matters, and automation helps most when timing is tight.
Your 2026 Eclipse Go-Bag Checklist and Troubleshooting
You want one bag, one case, or one clearly organized car kit that lets you set up without thinking. Eclipse day rewards systems that are dull, labeled, and complete. If you have to hunt for a missing cable or wonder where the filter went, the stress arrives early.
What goes in the bag
My eclipse go-bag has categories, not a random pile.
- Tracking core: Mount head, tripod, hand controller or phone, and any required plate or wedge.
- Optics: Telescope or smart scope, front-mounted solar filter, lens caps, and eyepieces if you'll observe visually.
- Power: Charged internal battery, external battery bank, charging cables, and any adapter your mount requires.
- Imaging extras: Camera body, memory cards, interval control if used, and the cable that connects camera to mount or phone.
- Field basics: Small cloth, tape, sunshade, printed checklist, and a simple way to keep loose parts from rolling away.
A lot of eclipse problems aren't technical. They're packing problems.
Quick fixes in the field
When something goes wrong, simplify first.
| Problem | Fast response |
|---|---|
| Alignment failed | Restart from the home position, recheck time and location, and confirm the tripod is level |
| Sun won't stay centered | Reduce load if possible, rebalance, and verify the mount is in the correct tracking mode |
| App won't connect | Close the app, reconnect to the telescope network or Bluetooth method, and avoid switching between too many devices |
| No power | Move immediately to backup battery power and stop nonessential devices from draining the main supply |
| View looks unsafe or too bright | Stop at once and inspect the filter attachment before continuing |
Keep a printed checklist in the bag. Phones fail, glare is real, and tired people skip obvious steps.
The safety rule that overrides everything
Safety protocols are mandatory. ISO 12312-2 certified eyewear must be used during all partial phases, the Sun is safe to view without protection only during the brief moments of totality, and filters must be placed on all camera lenses and telescopes to prevent immediate and permanent sensor damage, as explained in Forbes' eclipse safety guidance.
That applies even when you're rushed, excited, or convinced you only need a quick look.
Final Preparations and Eclipse Day Success
You arrive at a coastal turnout in Spain or on a windy headland in Iceland with less setup time than you wanted. The Sun is dropping, the light is changing fast, and a tracking mount that behaved perfectly at home now has to follow a target sitting low over the horizon. Eclipse day success comes from making that scene feel routine.
A good setup should feel calm. The tripod stands firm, the mount holds the Sun without wandering, the filter is attached securely, the battery has margin left, and nothing blocks the western sky. Quiet confidence is the goal, especially for a sunset eclipse where there is little time to fix a mistake once the light starts fading.
The final hours are about protecting simplicity. Spain can reward a fast roadside setup if your western view is clean. Iceland can punish loose gear, poor balance, and any mount that struggles in gusts. In both places, low-altitude tracking is the hidden challenge. A mount can track well high in the sky and still drift near the horizon, much like a car that feels fine on a straight road but pulls when the pavement tilts.
Last checks before first contact
Use the same short routine every time:
- Confirm the western sightline. Check the Sun's path, not just its current position. Hills, guardrails, parked vans, and even a small ridge can matter late in the event.
- Start tracking early. Let the mount follow the Sun well before the eclipse builds so you can catch drift while there is still time to correct it.
- Keep filters on through the partial phases. Remove a solar filter only during totality, then replace it the moment totality ends.
- Lock down loose items. Cables, dew shields, accessory trays, and lightweight tripods become problems quickly in coastal wind.
- Stop adjusting a working setup. If the Sun stays centered and the image is sharp, leave it alone.
Frequently asked questions for eclipse travelers
| Question | Answer |
|---|---|
| Do I really need a tracking mount for the eclipse? | If you want to watch calmly or capture images without constant recentering, yes. Manual tracking can work, but it adds workload right when you want your attention on the sky. |
| Is a smart telescope better than a traditional setup? | It depends on how practiced you are. Smart telescopes can speed up travel-day setup, while traditional mounts give you more control if you already know their quirks. |
| What if clouds roll in? | Mobility helps. A compact rig is easier to pack, move, and restart than a heavy setup with many separate parts. |
| Can I use my nighttime alignment routine in daylight? | Usually not as-is. Solar observing needs a safe daytime alignment method that you have already practiced. |
| Do I remove the solar filter during totality? | Yes, but only during totality itself. Treat it like a timed step, not a judgment call you make casually in the moment. |
| Will tracking help if I'm only observing visually? | Yes. It keeps the Sun centered so you can study the changing light, prominences, and corona instead of nudging the scope every few seconds. |
One last practical rule matters more than any feature list. Run your whole eclipse morning like a rehearsal, and keep your decisions small. If you are still debating mount settings, swapping accessories, or changing locations at the last minute, the setup is too complicated for a sunset eclipse.
If you're still deciding, focus less on owning the biggest telescope and more on building a setup you can deploy quickly, align safely, and trust near the horizon. That is where auto tracking telescopes earn their place on eclipse day.
For maps, timing tools, safety guidance, and location-specific planning for Spain, Iceland, and cities across Europe, visit Total Solar Eclipse 2026 Live. It's a practical companion for turning your eclipse plan into a successful viewing day.